SIMPLE BRAIDED THREE-LOOP FIGURES
To introduce my students to the world of loop passages (braiding) and the mathematics associated with it, i devised a simple weaving sequence to serve as a test pattern. The sequence features two braiding maneuvers. A loop made from a 2-span string should suffice since each begins with a 3-loop loom (Opening A).
The general formula is:
ldna opening (note for symmetric centers it is desirable to open with a spiral opening either rdna or ldna)
braid,
braid
rotate index loop +2/2
inuit out power lift (where braid = w, x, y, or z)
w, x, y, and z are braiding sequences defined as follows:
w braiding sequence
rotate index loop +1/2
thumb loop up through index loop and return
little finger loop up through index loop and return
x braiding sequence
rotate index loop +1/2
thumb loop up through index loop and return
little finger loop down through index loop and return
y braiding sequence
rotate index loop –1/2
thumb loop down through index loop and return
little finger loop up through index loop and return
z braiding sequence
rotate index loop –1/2
thumb loop down through index loop and return
little finger loop down through index loop and return
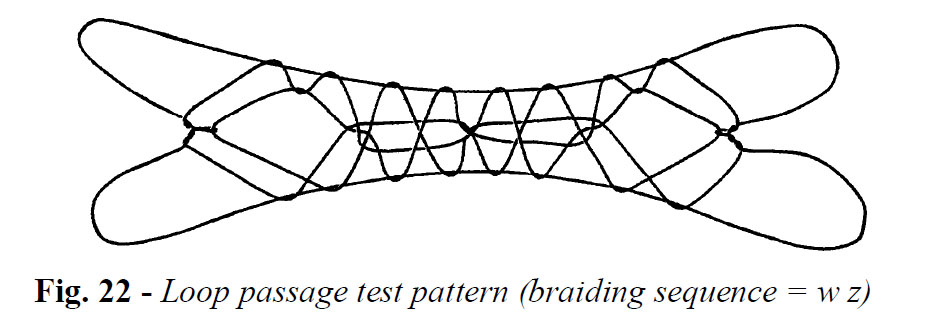
In order to explore all possible combinations you would need a 4-by-4 matrix (a table with 16 squares). But for now, just try making the figure whose braiding sequence is w z (fig. 22).
The formula is:
ldna opening
w
z
rotate index loop +2/2
inuit out power lift
To help you get started, the entire weaving sequence is spelled out below. Refined loop passages are used here, but manual loop passages work just as well. Use whichever method suits you.
Form the Loom
- Begin with ldna.
First Braiding Sequence (w)
- Roll the index loop +1/2 as follows: transfer the index loop to the thumb, inserting the thumb from below; then retransfer this loop to the index, inserting the index from above.
- Pass the thumb, carrying its loop near the top of the thumb, up through the index finger loop; transfer the thumb loop to the top of the index and return the thumb to its original position; transfer the upper index loop to the thumb, inserting the thumb from below.
- Pass each thumb under the index loop; transfer the little finger loop to the top of the thumb, then pass the thumb, with its loops, up through the index loop; transfer the upper thumb loop to the little finger and return the thumb to its original position.
Second Braiding Sequence (z)
- Roll the index loop –1/2 as follows: transfer the index loop to the thumb, inserting the thumb from above; then retransfer this loop to the index, inserting the index from below.
- Transfer the thumb loop to the top of the index, inserting the index from below; pass the thumb up through both index loops, transfer the upper index loop to the thumb and carry this loop down through the lower index loop, returning the thumb to its original position.
- Pass the thumb over the index loop, transfer the little finger loop to the thumb, then retransfer this loop to the top of the index finger and return the thumb to its original position; now pass the thumb up through both index loops, transfer the upper index loop to the top of the thumb, carry this loop down through the lower index loop, and transfer it to the little finger; return thumb to its original position.
Finishing Moves
- Roll the index loop +2/2 as follows: transfer the index loop to the thumb, inserting the thumb from below; then retransfer this loop to the index, inserting the index from above; again transfer the index loop to the thumb, inserting the thumb from below; then retransfer this loop to the index, inserting the index from above.
- Inuit Out (make the Inuit Net from the beginning, as if you had Opening A on your hands, see inuit net video).
· Power lift or Caroline Extension (fig. 22).
You may also wish to experiment with introducing a full index loop rotation rather than a half rotation at the beginning of the four braiding sequences, thus defining four new weaves (w*, x*, y*, and z*):
w* braiding sequence
rotate index loop +2/2
thumb loop up through index loop and return
little finger loop up through index loop and return
x* braiding sequence
rotate index loop +2/2
thumb loop up through index loop and return
little finger loop down through index loop and return
y* braiding sequence
rotate index loop –2/2
thumb loop down through index loop and return
little finger loop up through index loop and return
z* braiding sequence
rotate index loop –2/2
thumb loop down through index loop and return
little finger loop down through index loop and return
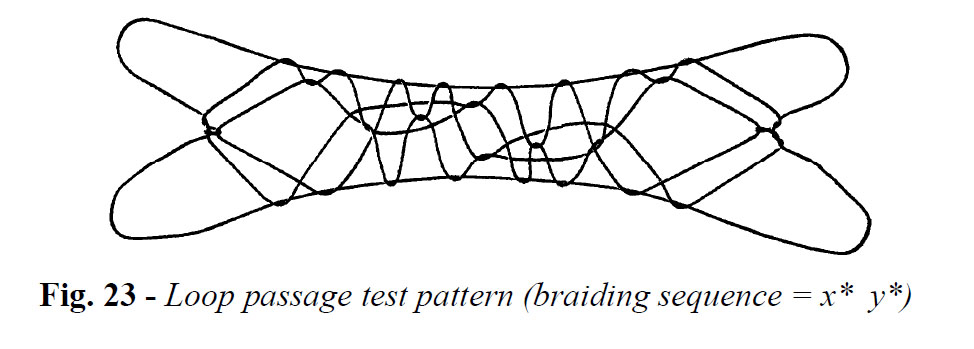
This simple modification converts the string crossing between each diamond to a wrap. For example, try making the figure whose braiding sequence is x* y* (fig. 23). Its center has an unusual symmetry caused by beginning with opening A rather than the ldna opening.
The formula is:
opening A
x*
y*
rotate index loop +2/2
inuit out power lift
The entire weaving sequence is spelled out below:
Form the Loom
- Begin with Opening A.
First Braiding Sequence (x*)
- Roll the index loop +2/2 as follows: transfer the index loop to the thumb, inserting the thumb from below; then retransfer this loop to the index, inserting the index from above; again transfer the index loop to the thumb, inserting the thumb from below; then retransfer this loop to the index, inserting the index from above.
- Pass the thumb, carrying its loop near the top of the thumb, up through the index finger loop; transfer the thumb loop to the top of the index and return the thumb to its original position; transfer the upper index loop to the thumb, inserting the thumb from below.
- Pass the thumb over the index loop, transfer the little finger loop to the thumb, then retransfer this loop to the top of the index finger and return the thumb to its original position; now pass the thumb up through both index loops, transfer the upper index loop to the top of the thumb, carry this loop down through the lower index loop, and transfer it to the little finger; return thumb to its original position.
Second Braiding Sequence (y*)
- Roll the index loop –2/2 as follows: transfer the index loop to the thumb, inserting the thumb from above; then retransfer this loop to the index, inserting the index from below; again transfer the index loop to the thumb, inserting the thumb from above; then retransfer this loop to the index, inserting the index from below.
· Transfer the thumb loop to the top of the index, inserting the index from below; pass the thumb up through both index loops, transfer the upper index loop to the thumb and carry this loop down through the lower index loop, returning the thumb to its original position.
- Pass each thumb under the index loop; transfer the little finger loop to the top of the thumb, then pass the thumb, with its loops, up through the index loop; transfer the upper thumb loop to the little finger and return the thumb to its original position.
Finishing Moves
- Roll the index loop +2/2 as follows: transfer the index loop to the thumb, inserting the thumb from below; then retransfer this loop to the index, inserting the index from above; again transfer the index loop to the thumb, inserting the thumb from below; then retransfer this loop to the index, inserting the index from above.
- Inuit Out (make the Inuit Net from the beginning, as if you had Opening A on your hands.
· Power Lift
To add complexity to the center, try exchanging the index loops just after completing Opening A (exchange means: transfer the right index loop to the top of the left index, inserting the left index from above; insert the right index from above and from the near side, into the lower left index loop, then lift this loop over the left upper index loop and off the left index, returning the right index to its original position).
For example, try the following:
opening A exchange index loops
y
y
rotate index loop +2/2
inuit out power lift
The index loop exchange creates a hole in the center of the design (fig. 24). Also note that the left half is not a true reflection of the right half.


