‘Tennis Net’ is my attempt to form a mesh-like figure using a 4-loop loom. Except for the finishing moves, loop passages are used throughout.
The inspiration for this figure is an iterative 3-loop Tikopian figure which I learned to make many years ago ‘Flock of Kingfishers’. A modified Caroline Extension is required to display the Tikopian figure (three loops are held instead of two). Unfortunately a hand injury prevents me from executing the Caroline Extension, so when I make the Tikopian Net I finish with Inuit Out followed by the Power Lift. And for the first Tikopian weave I substitute the first Inuit weave to alter the design somewhat.
Furthermore, my method for “resetting the loom” between iterations differs from the traditional Tikopian method. Readers interested in learning how i make this figure are referred to the Appendix.
Tennis Net resembles the Tikopian Net, but the web is more complex since the figure begins with four loops instead of three.
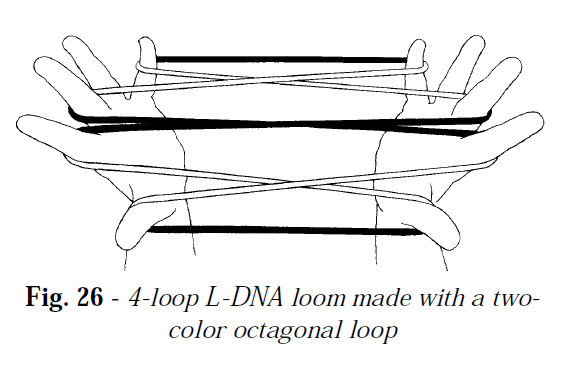
Although not illustrated here, Tennis Net is particularly impressive when woven with an octagonal loop (an eight segment loop with 45° arcs that alternate in color, arranged on the hands so that the string changes color as it winds around each finger,.
Tennis nets are hardy beasts that almost always extend well. In this respect they differ from many 4- and 5-loop Nauruan figures, which I like to think of as delicate hot house flowers that must be artificially nurtured to achieve their full beauty (i.e., the strings of the final design must be arranged).
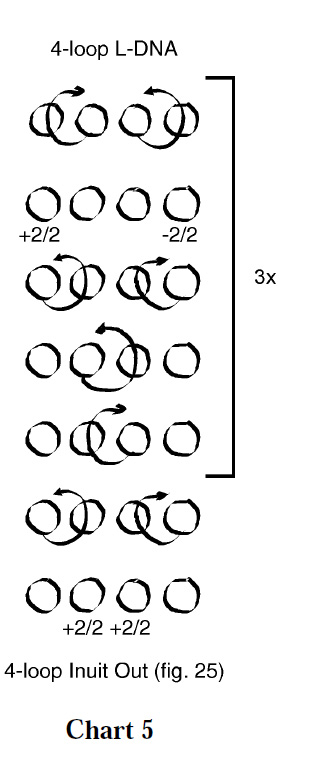
A loop made from a 3½-span cotton string is again recommended for making all 4-loop tennis nets. The algorithm for the prototypical 4-loop Tennis Net, rendered in circle notation, is given in chart 5.
A line-by-line translation might read:
• Line 1: 4-loop L-DNA loom.
• Line 2: Index loop up through thumb loop and return; middle finger loop up through little finger loop and return. (The order in which these are done does not matter).
• Line 3: Rotate thumb loop +2/2; rotate little finger loop –2/2.
• Line 4: Thumb loop up through index loop and return; little finger loop up through middle finger loop and return.
• Line 5: Index loop up through middle finger loop and return.
• Line 6: Middle finger loop up through index loop and return. The bracket labeled 3x indicates that the entire bracketed weaving sequence must be done three times before advancing to Line 7.
• Line 7: Thumb loop up through index loop and return; little finger loop up through middle finger loop and return.
• Line 8: Rotate index loop +2/2; rotate middle finger loop +2/2.
• Line 9: 4-loop Inuit Out followedby the Power Lift or Caroline Extension.
There are, in fact, numerous finishing moves that one can apply between the iterative sequence and the Inuit Out ending. In the example given above, two finishing moves are applied (lines 7 and 8).
Note that one can easily omit one or both of them and still generate a pleasing design.
an extended discussion on forming the 4 loop tennis net and also with an octagonal string
Since mastering this figure is essential, the complete weaving sequence using refined loop passages is spelled out below. Use a loop made from a 3½-span cotton string. During loop transfers, insert the specified finger from below unless instructed otherwise, and keep the transferred loop near the top of the finger to facilitate the loop passage maneuvers. Also, pass transferred loops over all intervening loops unless instructed otherwise. If refined loop passages prove too difficult, revert to the manual method using chart 5 as a guide.
Form the Loom
• Begin with a 4-loop L-DNA loom.
Weaving sequence
• Transfer each thumb loop to the top of the middle finger; transfer each index loop to the top of the thumb; pass each thumb, with its loop, up through the upper middle finger loop, then transfer the thumb loop to the index but do not withdraw the thumb from the upper middle finger loop; once the transfer is complete, release the upper middle finger loop onto the thumb and return the thumb to its original position, carrying the new thumb loop toward you under the index loop.
• Transfer the middle finger loop to the top of the thumb; pass each thumb, with its loops, up through the little finger loop, then transfer the upper thumb loop to the middle finger and return the thumb to its original position.
• Roll the thumb loop +2/2 as follows: transfer the thumb loop to the middle finger, inserting the middle finger from above; then retransfer this loop to the thumb, inserting the thumb from below; again transfer the thumb loop to the middle finger, inserting the middle finger from above; then retransfer this loop to the thumb, inserting the thumb from below.
• Roll the little finger loop -2/2 as follows: transfer the little finger loop to the thumb, then transfer the upper thumb loop to the middle finger; transfer the upper middle finger loop to the thumb, inserting the thumb from above; then retransfer this loop to the top of the middle finger, inserting the middle finger from below; again transfer the upper middle finger loop to the thumb, inserting the thumb from above; then retransfer this loop to the little finger, inserting the little finger from below.
• Pass each thumb, with its loop, up through the index loop; transfer the thumb loop to the top of the index and return the thumb to its original position; now transfer the upper index loop to the thumb.
• Pass each thumb under the index and middle finger loops, then transfer the little finger loop to the top of the thumb; without returning pass the thumb, with its loops, up through the middle finger loop; transfer the upper thumb loop to the little finger and return the thumb to its original position.
• Transfer the index loop to the top of the thumb; pass each thumb, with its loops, up through the middle finger loop; transfer the upper thumb loop to the index finger and return the thumb to its original position.
• Transfer the middle finger loop to the top of the thumb; pass each thumb, with its loops, up through the index loop; transfer the upper thumb loop to the middle finger and return the thumb to its original position.
Now repeat the entire weaving sequence two more times.
Finishing Moves
• Pass each thumb, with its loop, up through the index loop; transfer the thumb loop to the top of the index and return the thumb to its original position; now transfer the upper index loop to the thumb.
• Pass each thumb, with its loop, away from you under the index and middle finger loops, then transfer the little finger loop to the top of the thumb but do not return; pass each thumb, with its loops, up through the middle finger loop, then transfer the upper thumb loop to the little finger; withdraw the thumb from the middle finger loop and return the thumb to its original position.
• Roll the index loop +2/2 as follows: transfer the index loop to the thumb, inserting the thumb from below; then retransfer this loop to the index, inserting the index from above; again transfer the index loop to the thumb, inserting the thumb from below; then retransfer this loop to the index, inserting the index from above.
• Roll the middle finger loop +2/2 as follows: transfer the middle finger loop to the thumb, inserting the thumb from below; then retransfer this loop to the middle finger, inserting the middle finger from above; again transfer the middle finger loop to the thumb, inserting the thumb from below; then retransfer this loop to the middle finger, inserting the middle finger from above.
Complete the figure with the 4-loop Inuit Out procedure followed by the Power Lift or Caroline Extension.


