LESSON 1: THE INUIT NET
Forming the Loom
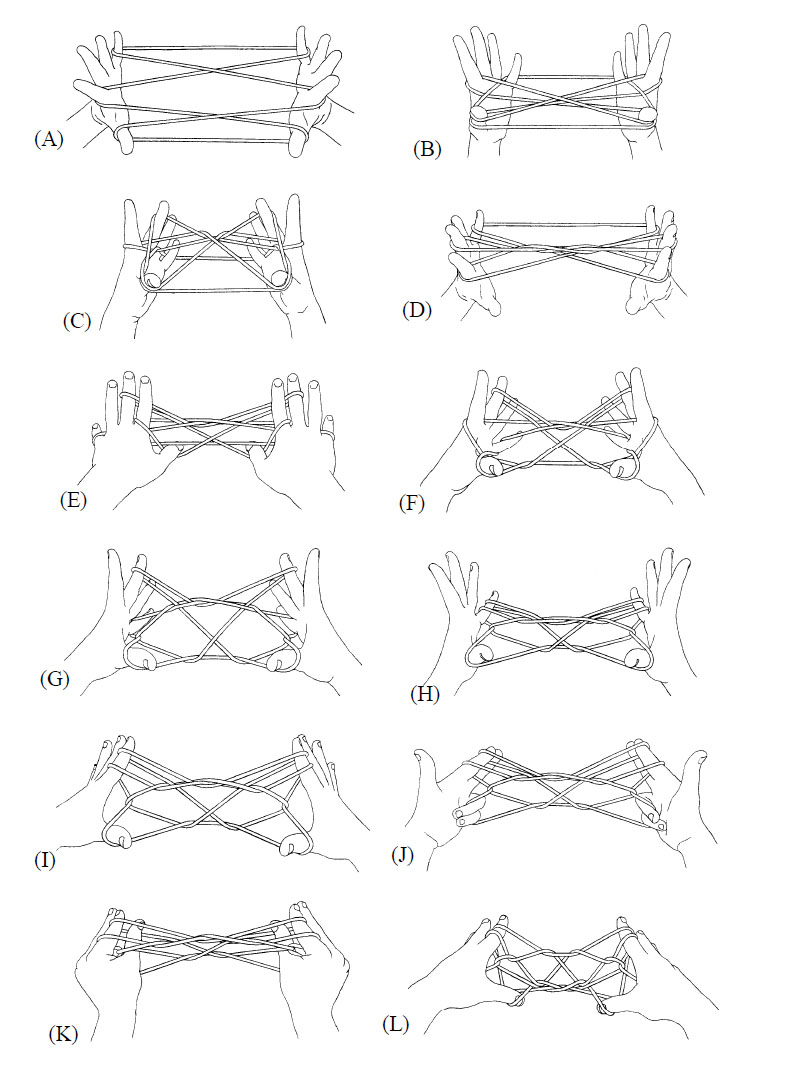
- Begin with Opening A (fig. A).
First Inuit Weave
- Pass each thumb away from you over the near index string and under the far index string, then pick up the near little finger string and return (fig. B).
- Pass each middle finger toward you over both index strings and down through the upper thumb loop (i call this “dipping into the well”), then pick up the lower far thumb string and return (fig. C).
- Drop both thumb loops and extend (fig. D).
Second Inuit Weave
- Pass each thumb away from you over the near index string and under all other strings (fig. E), then pick up the far little finger string and return (fig. F).
Shifting the Loops
- Drop the index loop (fig. G);
- Transfer1 the middle finger loop to the little finger (fig. H);
- Transfer both little finger loops to the index, maintaining their relative order (fig. I);
- Transfer the thumb loop to the ring and little finger2 (i.e., insert the ring and little finger into the thumb loop from below, close the near thumbstring to the palm, and withdraw the thumb, fig. J).
Fixing the Bottom
- Pass each thumb under both index loops and away from you through the ring-little finger loop (i call this “passing through the hole”), then pass the thumb up behind the strings and insert it, from below, into the upper index loop (fig. K);
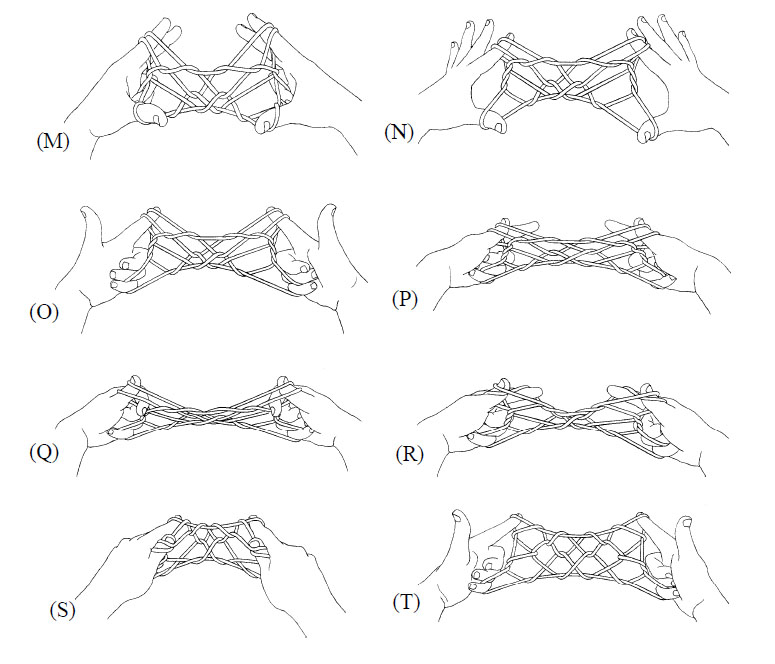
- With each thumb hook down the upper far index string and draw it down through the ring-little finger loop (i.e., “through the hole”) until the thumb is below the far little finger string (fig. L), then with each thumb pick up the far little finger string and draw it through the loop on eachthumb, which slips off as you return (fig. M).
- Drop the ring-little finger loop and extend (fig. N).
Cleaning the Top
- Transfer the thumb loop to the little finger (i.e., insert the little finger into the thumb loop from below, close the near thumb string to the palm, and withdraw the thumb, fig. O).
- Transfer both index loops to the thumb, maintaining their relative order (fig. P).
- Insert each index, from above, into the upper and lower thumb loops (fig. Q), pick up the lower near thumb string, and draw it through the upper thumb loop (fig. R, i call this “kicking away” the string); then curl the tip of each index around the upper near thumb string, drawing this string away from you and up through the index loop, which slips off (fig. S).
- Drop both thumb loops and extend to complete the figure (fig. T).


